
Hawkeye: Scope Plot
The Scope service computes a representation of the time history waveform of the channels. The data is displayed in the oscilloscope instrument.
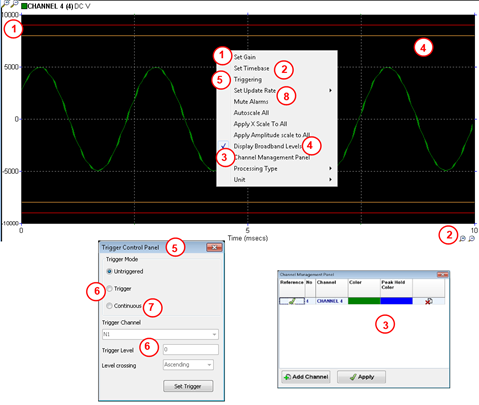
- Amplitude scale is configurable via the gain panel, the +/- zoom buttons, or by clicking on the scale max or min value, and typing the value directly.
- Time scale is configurable via the time base panel, or the +/- zoom buttons.
- Change the channel to display, using the channel management panel. It is possible to display multiple channels on the same instrument, provided they have the same acquisition units. The other way to select the channel to display is to select the channel in the peak-hold bar graph, and drop it in the instrument.
- Tick to display the warning and alarm broadband levels defined for the channel on display
- The display refresh rate can be fixed or based on another channel level (trigger).
- In the trigger setting panel, setup the trigger channel (crossing level, gradient). Every time the condition on the trigger channel will be met, that will trigger the computation of a new scope for the triggered channel, starting from the trigger point.
- Continuous mode means the time base of the scope is adjusted to the update rate, so that there is no gap or overlap between 2 consecutive scope displays. For example, when using an update rate of 20 Hz, selecting continuous mode will set the time base to 50 milliseconds.
- For a fixed update rate of 1 Hz, 2Hz, 5Hz, 10 Hz, or 20 Hz.
IMPORTANT: Unlike the amplitude scale, the time base, update rate, and trigger settings are processing parameters of the scope service, on a per channel basis. Therefore, changing any of those settings on an oscilloscope instrument will apply to any other oscilloscope instrument (possibly on a different screen, or on a different computer) displaying the same channel.
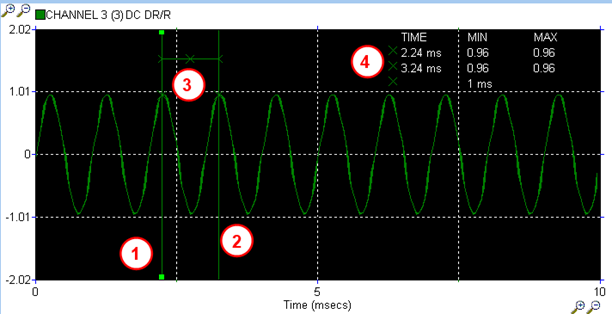
- Drop a time cursor by double clicking with the mouse in the time position of choice. The handles on the vertical line shows that this is the selected cursor. Pressing the delete key will delete the current cursor. To move the cursor position, click on it and then drag it.
- A second time cursor.
- Delta time cursor: click on the first time cursor, then CTRL click on the second time cursor to add a delta time cursor between the two.
- The cursor table shows for each time cursor, the relative time and amplitude. For the delta time cursor, the time difference between the 2 time cursors.