
Hawk GUI: Setting up the Test Cell
The test cell concept allows multiple HGL systems to co-exist on the same network without interfering with each other.
It is a way to group logically all the elements (acquisition hardware, real-time monitoring screens) that belongs to the same acquisition system.
Any test cell will have:
- One single Hawk Controller,
- One or more Hawk Acquisition engines,
- One or more Acquisition devices,
- Zero, one, or more real-time screens.
From the Hawk GUI system setup screen, the user will be able to view the current test cell setup (and its components), and also add / remove elements from it. To get to the setup screen, from the home Hawk GUI page, click the far bottom right button labelled "System Setup".
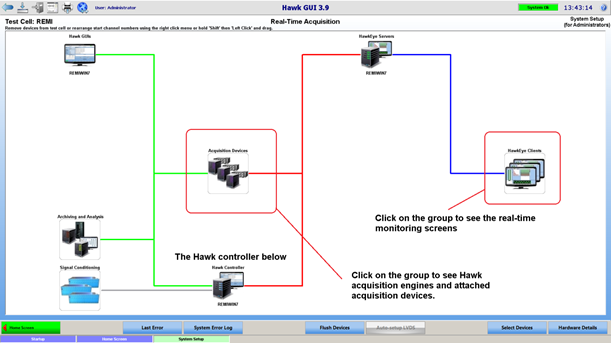
The system setup screen is arranged into multiple pages and multiple sections within a page, the main page is show below:
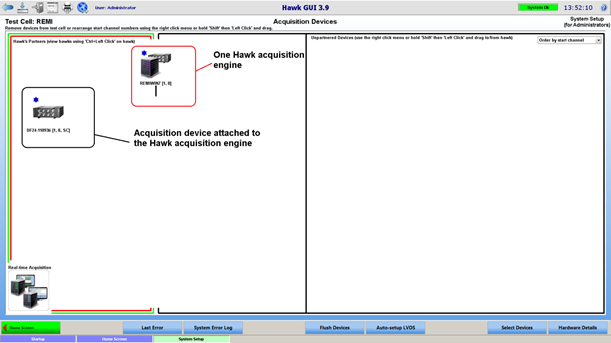
Below shows the acquisition devices page. Note that the device attached to the Hawk acquisition engine is not immediately visible, you have to press the control key and click on the Hawk image to show its attached devices, and “ctrl-click” again to hide them.
Adding Devices to a Test Cell
From the device page, it is now possible to add / remove a Hawk acquisition engine to the test cell, or an acquisition device.
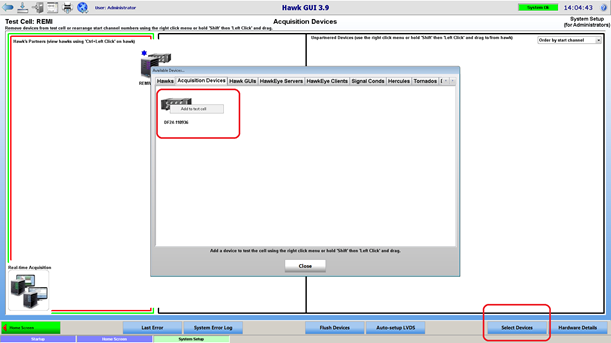
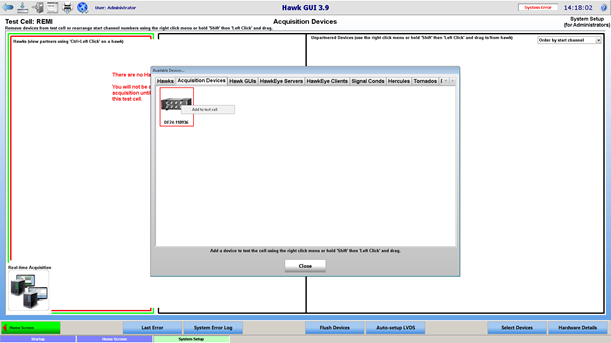
As illustrated in Figure 10 below, click on the “Select devices” button; select the appropriate tab (“Hawk” tab to add a hawk acquisition engine, or the “Acquisition device” tab to add an acquisition device). Finally, right click on the item to add, and select “Add to test cell”. Within a few seconds, the item added will appear in the test cell.
In the same way, HawkEyes can be added from the real-time monitoring screen page.
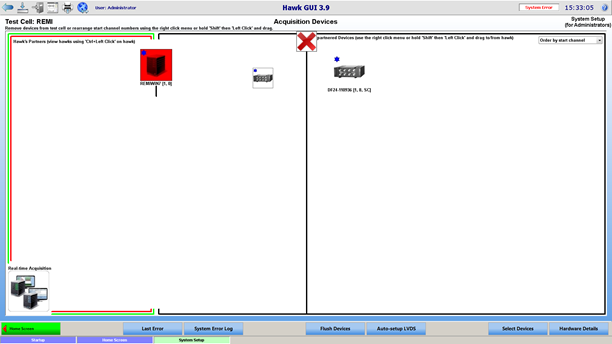
It is possible to add a device in your test cell, which is already being used in another test cell (in other words, already used in another HGL Acquisition system). In this case, the device will be show in a red square, and a warning will be displayed when adding the device to the test cell (as this could be disruptive to the system which was using it so far):
Removing Devices from the Test Cell
Below shows how to remove a Hawk from the test cell. The popup menu is shown by right clicking on the item. An acquisition device can be removed in the same way, or a HawkEye device can be removed from the real-time monitoring screen page.
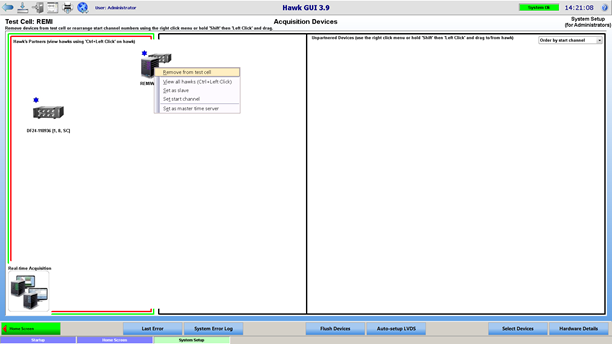
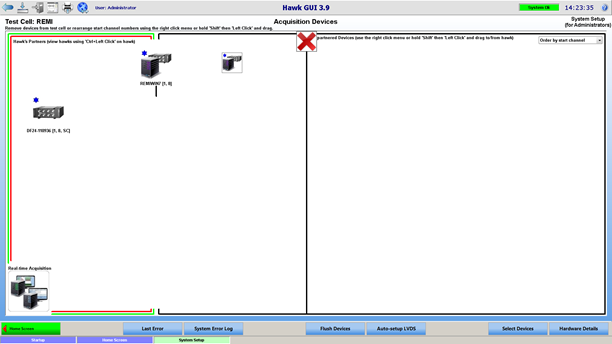
An alternative way is to drag the item and drop it onto the top middle red cross, as shown in Figure 13 below:
Setup Acquisition Hardware
Setting up the acquisition hardware is done in multiple steps:
- Add the acquisition devices to the test cell.
- Partner the acquisition devices to Hawk acquisition engines.
- Setting up the master acquisition devices.
- Setting up the start channel.
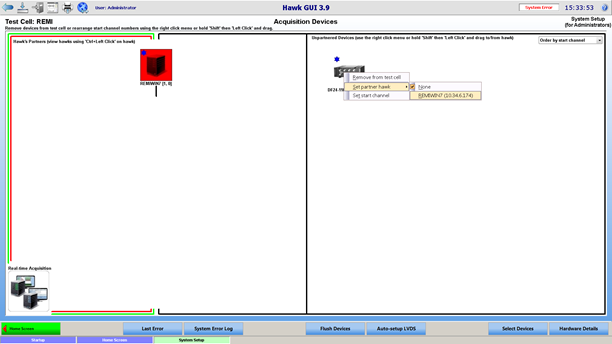
Partnering an Acquisition Device to a Hawk
All HGL acquisition hardware is based around the 8 channel acquisition card called a Dragonfly. The Dragonfly card streams the acquired data to the Hawk acquisition engine to which it has been partnered, via an Ethernet connection.
A Hawk can be partnered to multiple dragonfly cards; a dragonfly can only be partnered to one Hawk. The partnering is done in the system setup acquisition group page, by dragging an un-partnered device and dropping it onto a hawk, or via a right click on the un-partnered device.
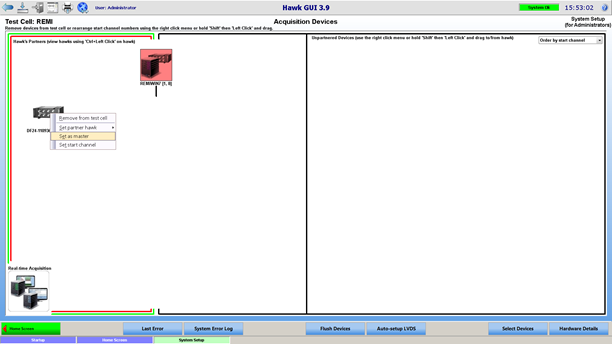
After the Dragonfly is added to the test cell, it needs to be assigned as a Master. HGL also requires that a system containing more than one acquisition device use hardware time synchronization, this is necessary to ensure that the data acquired from the various devices are sample locked.
The HGL Dragonfly (Eagle, Hummingbird, etc) acquisition modules have different hardware methods of synchronization:
- LVDS: Low Voltage, Differential Signal. In this case LVDS cables are used to daisy-chain the acquisition devices. LVDS can be used to directly connect any local devices to a GPS, IRIG, or PTP master.
- GPS synchronization: no cabling between the 2 devices is required for the synchronization, as long as all the devices receive the GPS signal. Requires a GPS receiver card to be fitted on the dragonfly card.
- IRIG synchronization: no cabling between the 2 devices is required for the synchronization, as long as all the devices receive the IRIG signal via a dedicated input. Requires an IRIG input board to be fitted on the dragonfly card.
- IEEE1588 (PTP): Available on V2 Sync Box and available as an option on front end hardware. PTP uses existing ethernet cables and devices work out between each other the actual time as defined by a Grand Master.
One of the methods will be used depending on the hardware capabilities, in some cases a mix of them: it is possible to have multiple LVDS chains on devices, with all the masters of each chain synchronized together via GPS or IRIG.
In terms of the software setup, it is required to designate the master(s) within the system; this has to match the hardware setup, otherwise an error will occur when attempting to go to scanning.
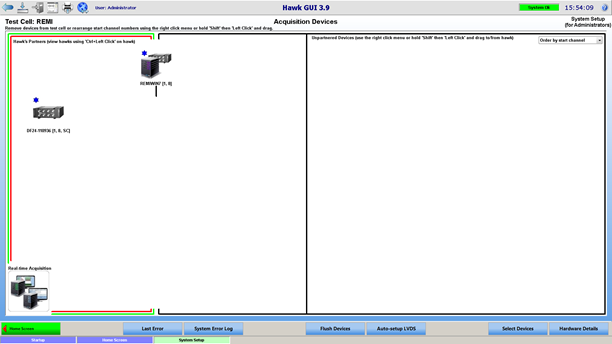
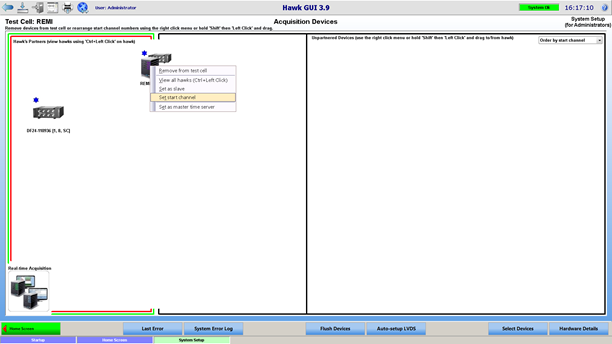
To set an acquisition device as master, right click on it, and select “set as master." It will then appear with a blue star, so will the Hawk to which it is attached.
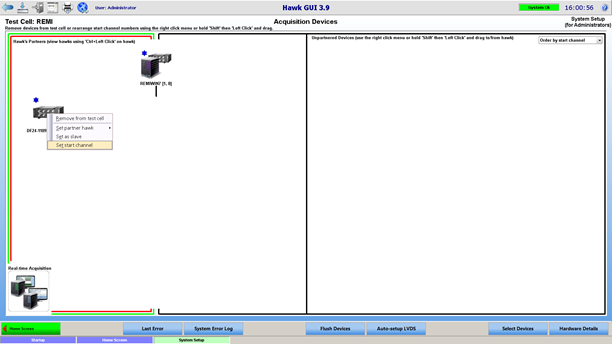
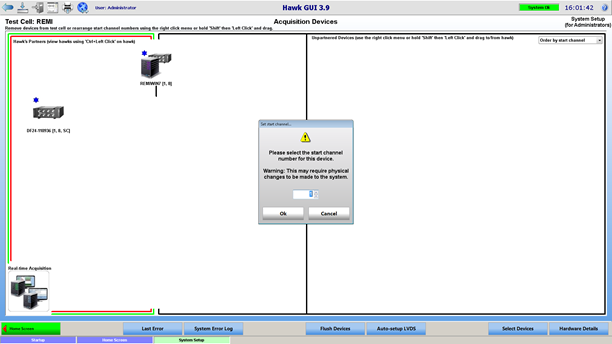
Once the Acquisition hardware has been added to the test cell, the start channel needs to be assigned. The acquired data will be recorded against a channel listed in the configuration file, this is how the data will be referenced in the HGL database and retrieved later on for post processing. As the system has no way to know which device is physically connected to which channel, the module must have its start channel manually assigned.
To set the start channel of an acquisition device, right click on the device and select “Set start channel”.
A dialog will allow you to select the start channel of the device:
When a Hawk is attached to multiple acquisition devices, the Hawk will be assigned the start channel of the lowest start channel among the acquisition device attached to it.
It is also possible to change the Hawk start channel (see Figure 19). In this case, the start channel for each of its acquisition devices will be shifted by the same amount. For example, moving a Hawk from start channel 1 to start channel 9, will move every attached device’s start channel up by 8.
For any acquisition device or Hawk, next to its name, the following is displayed in brackets:
- Its start channel, followed by
- Its number of channels (for a Hawk, this is the sum of the number of channels on each attached device).
- Any additional features such as signal conditioning hardware
Once the acquisition devices have been setup, assigned to a Hawk, and configured with the correct start channel and set as a master or slave device (as required), it is necessary to setup the additional devices for the test cell.
The Hawkeye Server and Hawkeye Clients can be added to the test cell when in the specific Hawkeye Servers and Hawkeye Clients system setup pages. If the system does not have a Hawkeye Server, the system setup page has a blank spot for the Hawkeye Server icon.
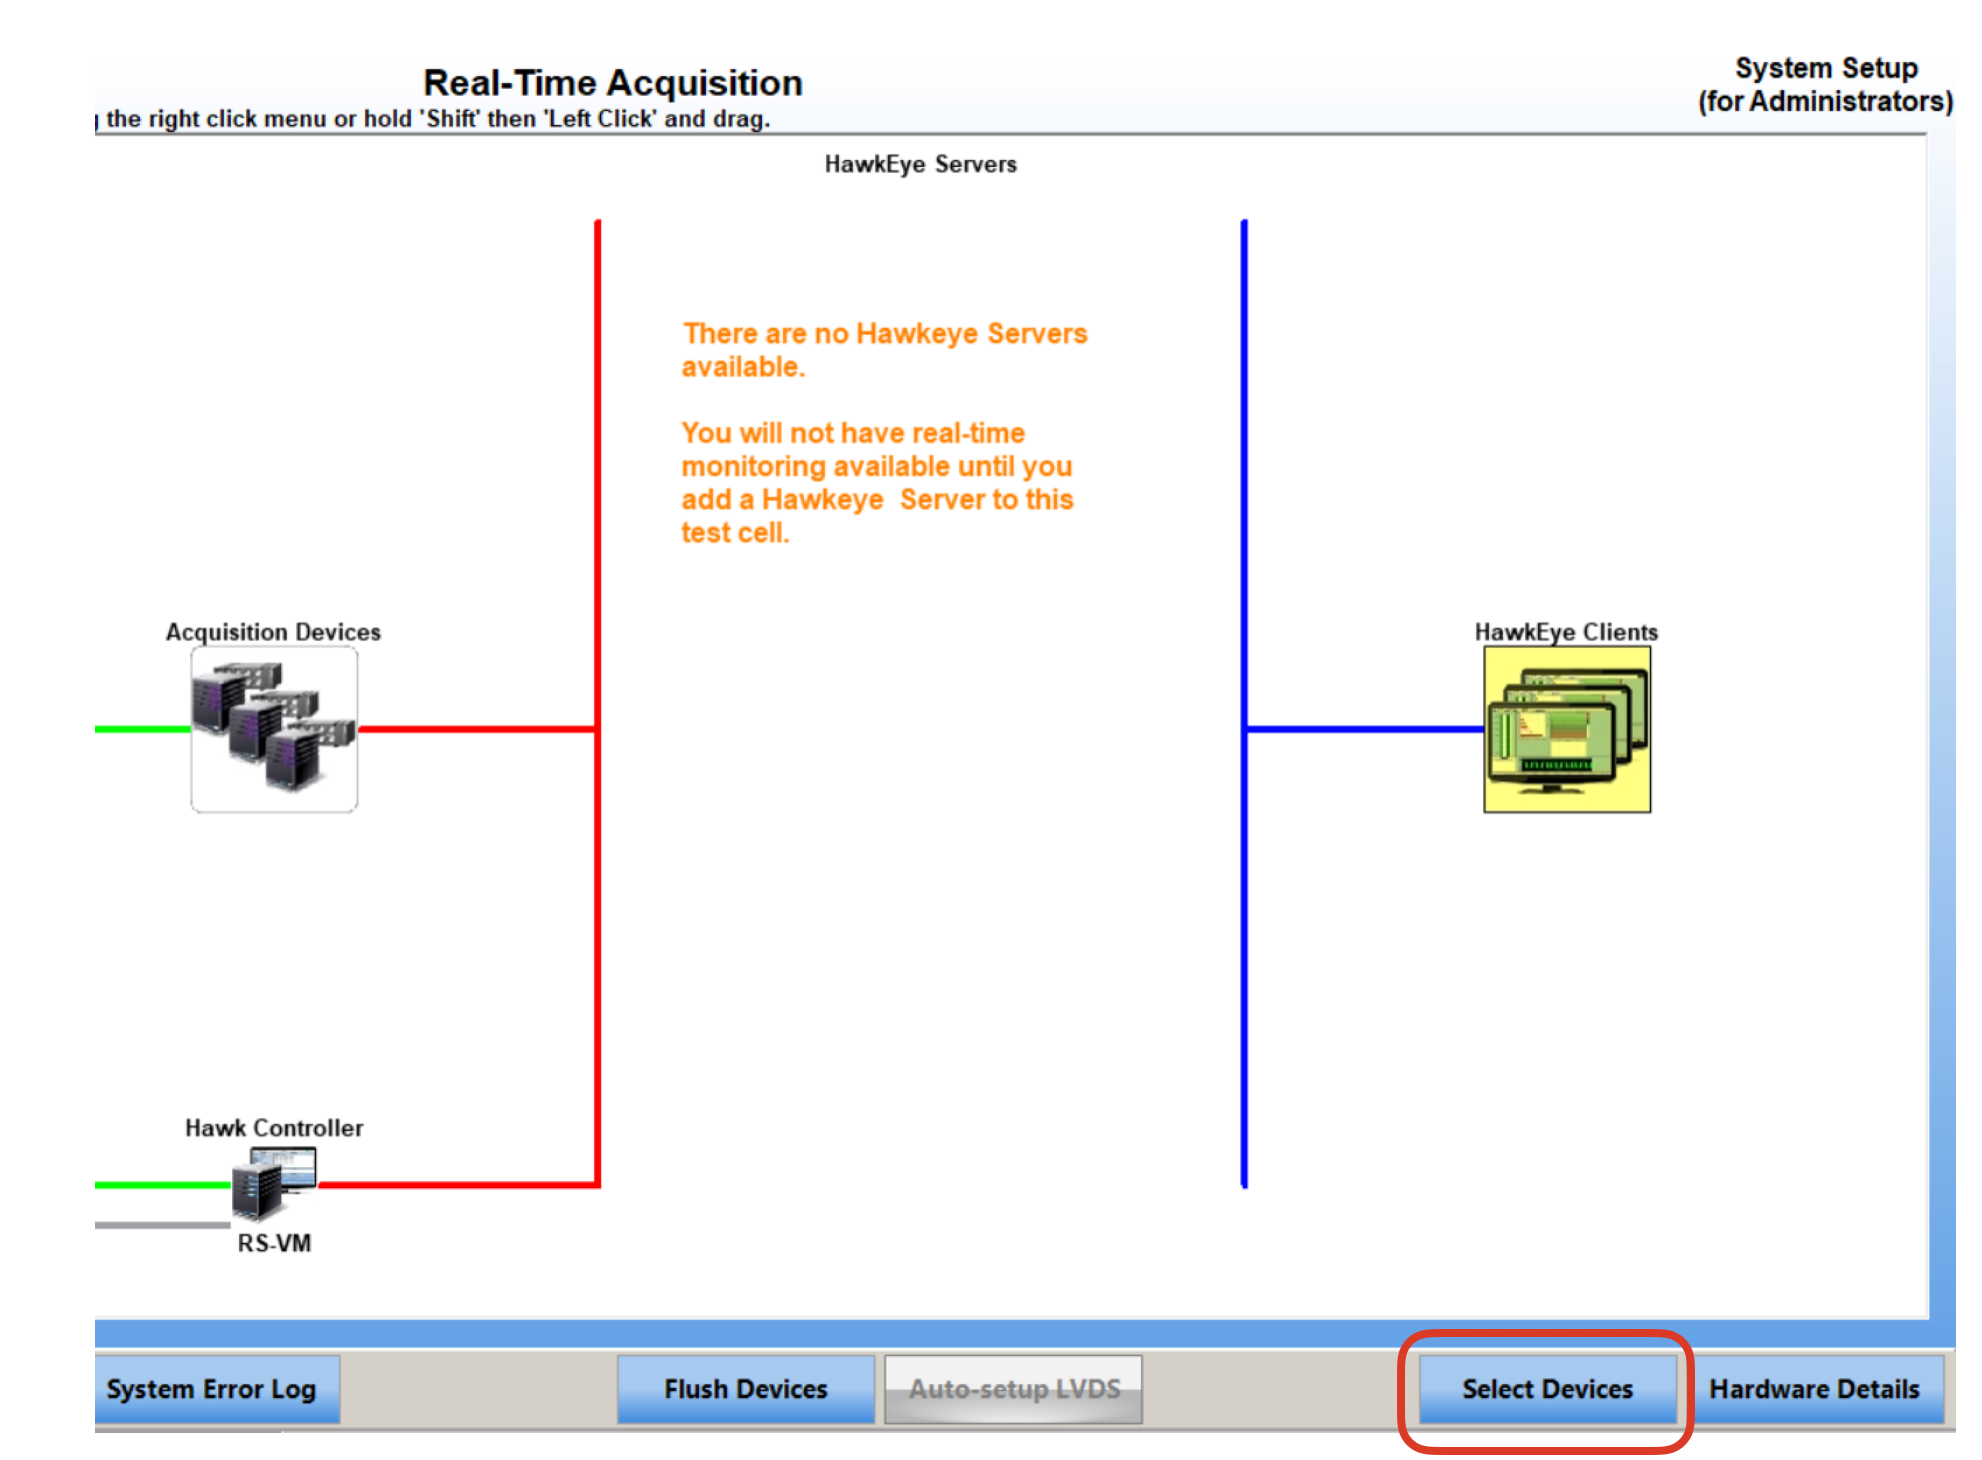
Click the "Select Devices" button and go to the Hawkeye Server tab to select the Hawkeye Server to add to the Test Cell. Right click on the Hawkeye Server icon and select add to test cell. If it has a red outlined box, then it is already part of a different Test Cell.

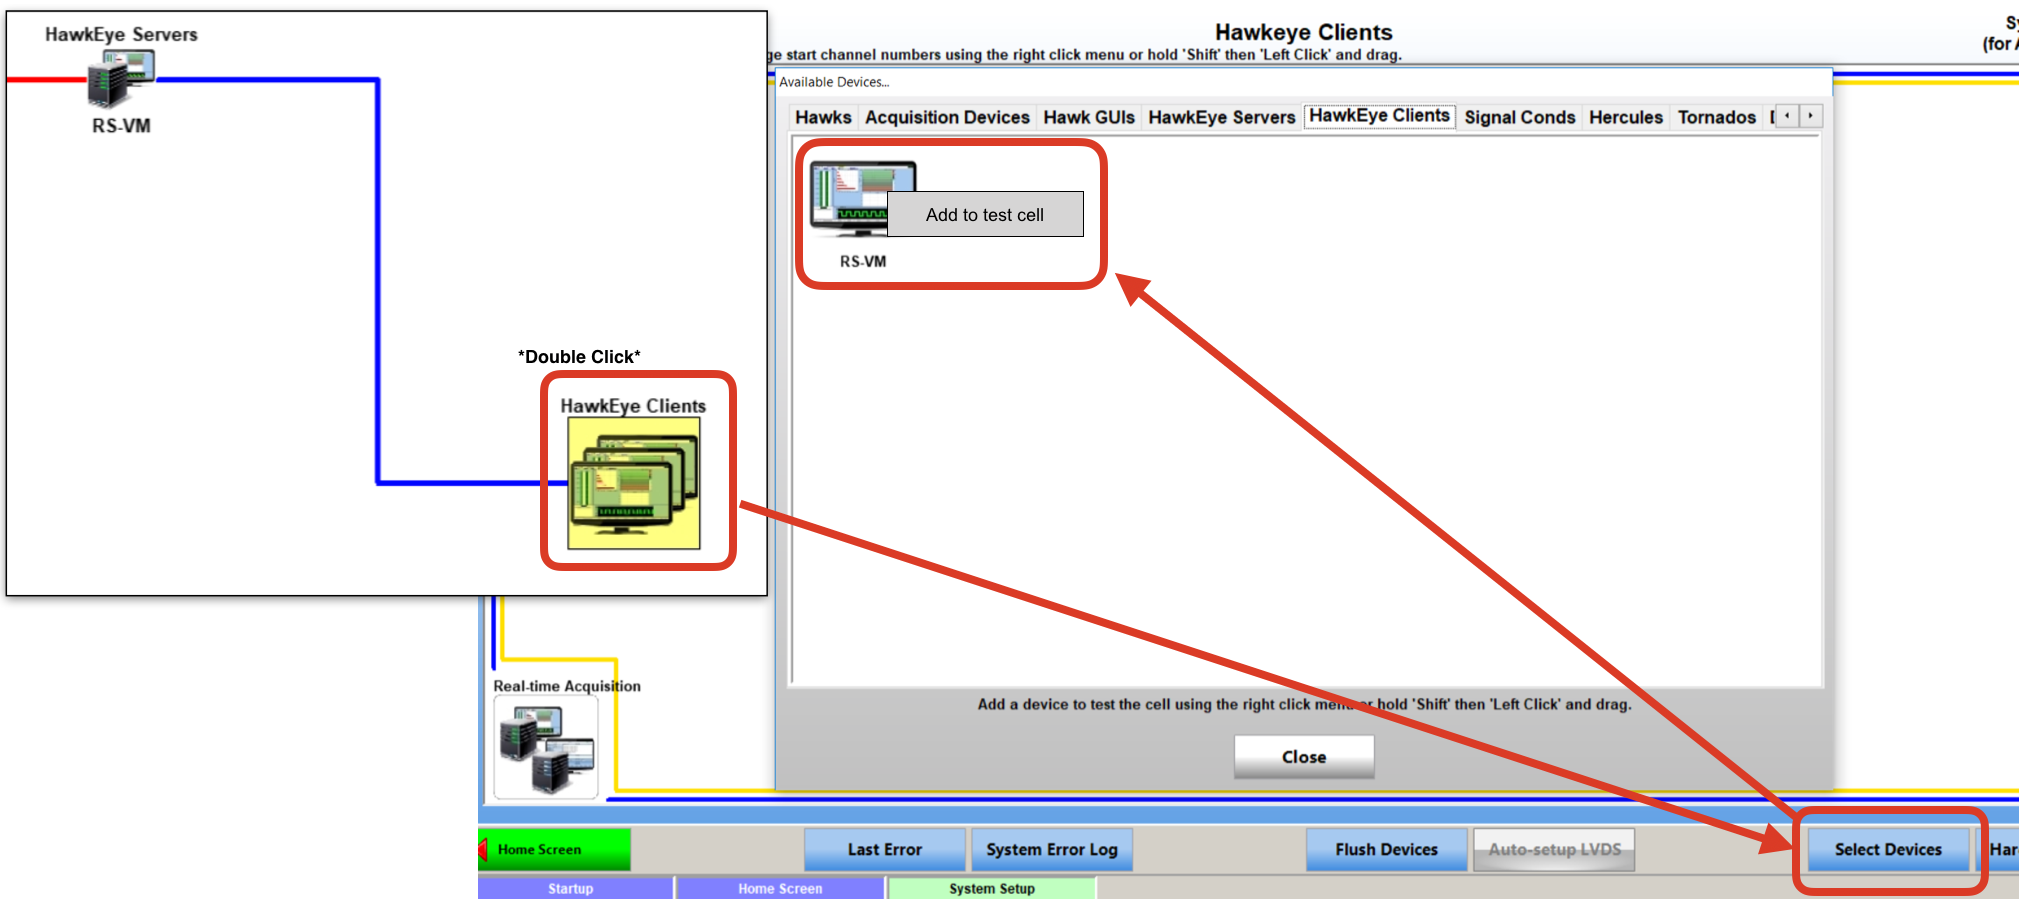
To add a Hawkeye Client, uses can add directly from the Hawkeye Client right hand pull out menu (V3.9 and newer only), or double click on the Hawkeye Client Icon, click on the "Select Devices" button, right click on the appropriate Hawkeye Client icon, and select "Add to test cell".
Aurora and Hercules are not added to the Test Cell from the Hawk GUI interface. However, a right click on the Hawk Controller icon will allow the test cell to be assigned to an available File Transfer Manager. Additionally, to connect to a different Hawk Controller / Test Cell, right click on the Hawk GUI icon and a menu will appear to "Remove from Test Cell. A pop up window will appear allowing the Hawk GUI to join a different Test Cell.