
External Hawkeye Setup
Setting Up External Hawkeye Client
On External Hawkeye Machine
- Shutdown all running software
- If no software installed on the Hawkeye Machine currently, create an HGL Software folder on the C drive and Copy over the following files
- Hawkeye.exe
- Hawkeye.trans
- Hawkeye.ini
- SafetySetup.trans
- ObjectInspector.ini
- ALL .DLL files in C:\HGL Software
- Connect USB Ethernet Adapter
- Set IP address for adapter – See instructions in Hawk Section
- Open the Hawkeye.ini file located in C:\HGL Software
- In the [DistributedHawkEye] section change the lines ‘IPAddress=’ to match the same broadcast address as above

- Start Hawkeye

On Hawk Laptop
- Shutdown all running software using HGL System Manager
- Connect USB Ethernet Adapter
- Set IP address for adapter, be sure this address does not conflict with any other networks the laptop has access to (ie. WIFI, Hummingbirds, etc.).
- Right Click on the Windows Icon in the lower left corner, select Network Connections
- Under ‘Advanced network settings’ select ‘Change adapter options’
- Find the newly added ethernet adapter and right click select ‘properties’
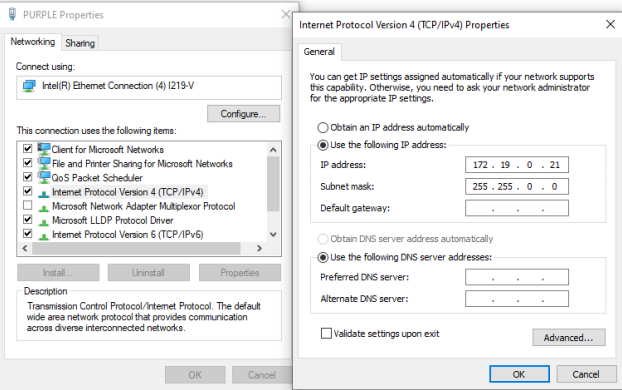
- Click ‘Internet Protocol Version 4’ to highlight it then click ‘Properties’
- Select ‘Use the following IP Address:’ then fill out the IP Address and Subnet Mask and click ‘OK’
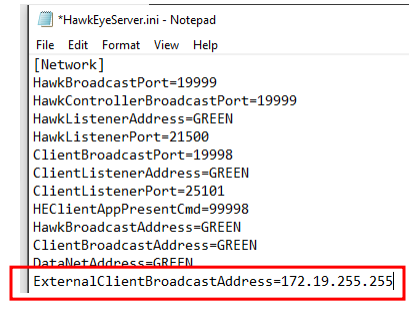
- Open the HawkeyeServer.ini file located in C:\HGL Software
- In the [Network] Section of the .ini file change the line ‘ExternalClientBroadcastAddress=’ to have the broadcast address of your ethernet adapter.
- For example, if the network adapters IP address is set to 172.19.0.20 with a subnet of 255.255.0.0 then the Broadcast Address would be 172.19.255.255
- For example, if the network adapters IP address is set to 172.19.0.20 with a subnet of 255.255.0.0 then the Broadcast Address would be 172.19.255.255
- Start HGL System Manager
- Add the new Hawkeye to the test cell using HawkGUI on the Hawk Laptop, if the Hawkeye.ini file was copied over in step one the new Hawkeye Client may automatically be added to the test cell.
- Once on the Configuration Screen of HawkGUI, click ‘System Setup’ button on the bottom right corner of the screen.
- Double-click Hawkeye Clients
- Click ‘Select Devices’ button on the bottom right corner of the screen
- Right click on the new Hawkeye and add it to test cell

